Beginner's Guide
This beginner's guide will teach you how to solve the famous Rubik's Cube, even if you've never picked one up before! If you got given one for Christmas, found one in the dusty cupboard of an aging relative, or need to win a bet and soon, then read on to learn the method!
If you can already solve one, then why not head over to the speedcubing page and really step up your game. My personal record is 17.24 seconds - do you think you can beat it?
Let's begin!
Step 1 - The Cross
The first thing to do is to be aware of two facts:
- The centre pieces don't move.
- The cube is solved layer by layer, not face by face.
Well now you're aware of them, so that's a good start. But here's why they're important: because the centre pieces don't move, the face with a white sticker in the centre will always be the white face. You can test this quite easily by rotating any face of the cube - you can see that the centre pieces only ever rotate, and never move around in relation to each other. This is really very important, as it means that instead of trying to shuffle around the 54 stickers of the cube, you're actually only moving 20 pieces (8 corner pieces and 12 edge pieces). Just like how the centre piece of any face is always that colour, every piece will always have the same stickers on (unless you're the worst sort of cheater, but you wouldn't be reading this if you were).
Fact number 2 (that the cube is solved in layers) is a direct result of this. For example, because the white and red piece has a white sticker and a red sticker, whenever you use it to solve the white face, you are also starting to solve the red face. The same goes for the three other edge pieces and the four corner pieces that make up the white face. So whenever you solve the white face, you're actually solving the first few pieces of the four adjacent faces, aka the first layer, at the same time.
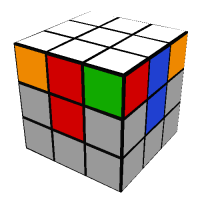
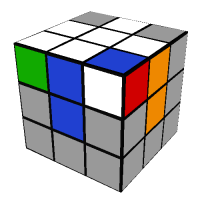
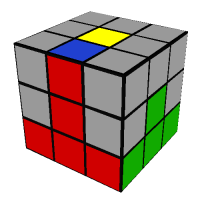
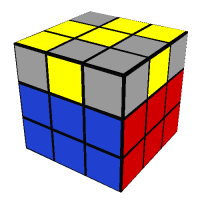
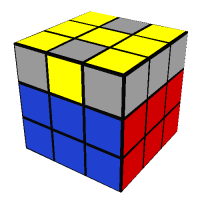
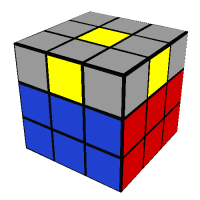
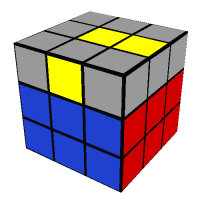
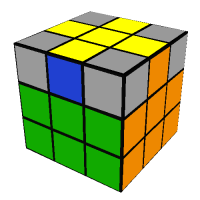
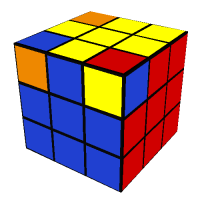
Without further ado then, and as you might have guessed from "Step 1 - The Cross" written in very big letters just up there, the first thing to do is to create a cross, like this:
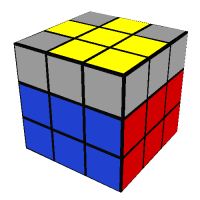
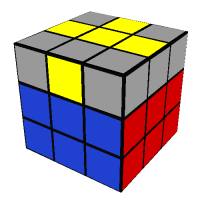
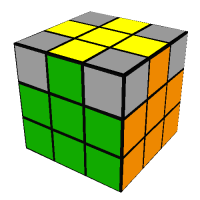
Where the colours in the other faces correctly match up with the centre pieces of the same colour, and not like this:
where they don't. Any 'cubies' (the 20 pieces that make up the Rubik's Cube) that are grey can can just be ignored, as they are just cubies that aren't important yet.
You will also notice that the crosses here are white, a decision not made at random. Every single time you do the cube, you should start with white at the top so you get used to always looking out for the same colours at different stages. If I were to pick up a cube and start with, say, the green face, I would get terribly confused when it came to the last layer because I am so used to looking for yellow pieces instead of blue ones. Most other Rubik's Cube resources also start with the white face, so if you get used to it now you'll always know precisely what's going on.
Explaining exactly how to create this cross can be a little challenging, as it relies mostly on logic - I can't tell you exactly what moves to do, because your cube will be shuffled differently to mine. I heartily recommend you sit and devote some brain power to trying to work it out yourself, as both a mental exercise and a bit of fun. However, if you are struggling, or don't think this qualifies as fun, or perhaps if you're only here to learn to solve a Rubik's Cube as soon as possible in order to win a bet and aren't interested in whimsical things like fun, then here's what you should do in some specific situations:
 R
R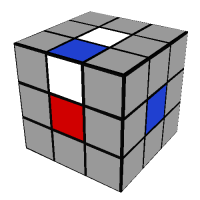 F R
F R F R U
F R UIf you haven't already explored the notation page, you might be slightly confused at the Rs, Fs, and Us lurking about next to the above images, but worry not! It's really rather simple - each letter denotes a face of the cube:
- U for Up
- D for Down
- L for Left
- R for Right
- F for Front
- B for Back
Each letter simply tells you to move that face clockwise by 90 degrees. An apostrophe after a letter (like F', said 'anti-front') tells you to move that face anticlockwise instead, and 2 after a letter (like R2) tells you to move that face twice, so by 180 degrees. These letters are chained together in sequences called algorithms, so the algorithm F R U above is telling you to rotate the Front face clockwise by one turn of 90 degrees, the Right face clockwise one turn, and the Up face clockwise one turn.
Just remember that 'clockwise' can be different depending on how you're looking at something. Turning a face clockwise on the cube is always done as if you were looking directly at that face. If you ever need help with a step in an algorithm, you can touchhover over any step to see how it is performed. You can also look at the notation page for an overview of the various notations used on this website.
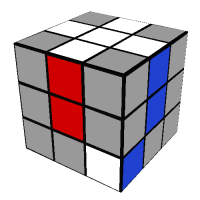
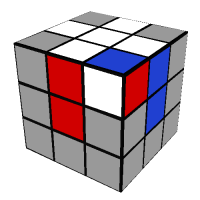
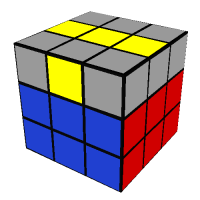
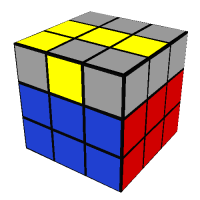
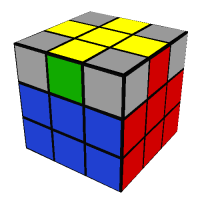
A common situation to end up in is this:
Here, the blue and red edge pieces don't match up with the correct centre pieces. They can be swapped around without affecting the rest of the cross like so:
R' U' R U R'Step 2 - The Corners
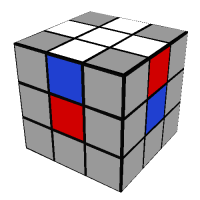
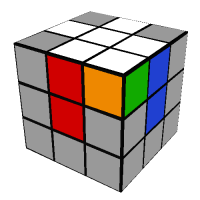
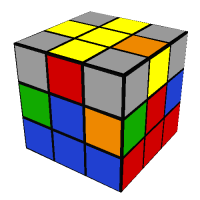
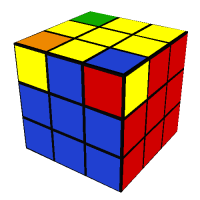
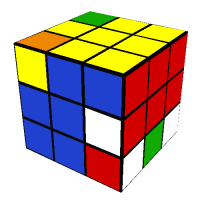
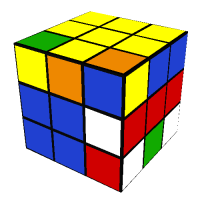
The next step is to put the corners in, like this:
Just like the cross before, it is important that the corner pieces match with the pieces around it, i.e. not like this:
It's likely that at least one white corner piece will be on the bottom layer. To correctly place such a corner, first put the cubie underneath where it needs to go (for example, the white-blue-red cubie should be underneath the white-blue-red corner). Then, depending on which of the three ways the white side of the cubie could be facing, use one of these algorithms:
 F D F'
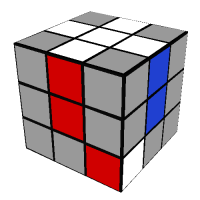 R' D' R
 R' D R F D2 F'
The algorithms for taking a corner from the bottom layer and putting it into the top layer are relatively simple, so you should do these cases first. This also has the added benefit of displacing any incorrectly placed white corners in the top layer. Look at this example:
You can see that the white-orange-green piece is clearly in the wrong place, so you might you think that you should solve that one first. In fact, you should solve the white-blue-red first (using the above algorithms) because it will displace the white-orange-green into the bottom layer, which you can then solve as normal. Thinking about the order in which you do things like this will help to reduce the amount of work you have to do, and therefore take less time and make the whole process that much more enjoyable.
If, as in the previous example, the white-red-blue piece is also in the top layer, you can bring it down to the bottom layer by using the above algorithms. You simply put some other piece in its place, like so:
 F D F'
This puts the white-red-blue piece that you wanted in the bottom layer, so you can solve it as described before to bring the white-orange-green piece to the bottom layer, which can solved next.
The remaining case that you might run into is where the corner will be in the correct place in the top layer, but just needs reorienting. For example:
 R' D R F D F'
You should be able see that this algorithm works in precisely the same way - it brings the cubie down into the bottom layer, then puts it back facing the right way.
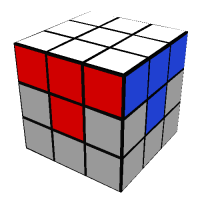
Step 3 - The Second Layer
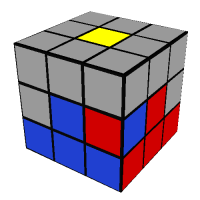
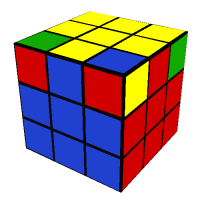
Now that the first layer is complete, it's on to the second layer:
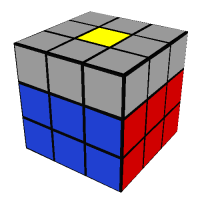
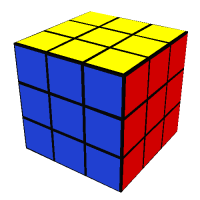
Some of you will have noticed something very peculiar about this picture. If you haven't, I'll spoil it for you: the cube is now upside-down. This is the first thing to do when tackling the second layer, so you can see what you are doing. I'll give you a moment for you to go ahead and do that now.
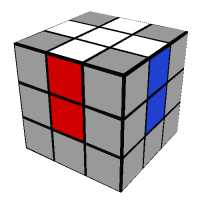
Next, look in the top layer (which is now the layer with the yellow face) to find one of the second layer pieces that needs to be solved. In this case we'll do the the blue and red edge piece first. Turn the top layer until the piece forms an upside-down 'T' shape, which will be one of two possible colours depending on which way around the piece is:
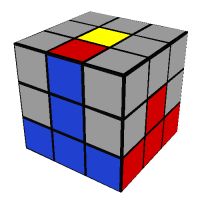
It will now need to move either left or right into it's correct location, i.e. between the blue and red faces. Above, you can see that if you made a blue upside-down 'T', the piece needs to move to the right, and if you made a red 'T', it needs to move to the left. The two algorithms below for these situations are therefore the mirror image of each other, and, at eight steps apiece, they are the longest algorithms used in this guide.
U R U' R' U' F' U FMoves the top layer edge piece to the right
U' L' U L U F U' F'Moves the top layer edge piece to the left
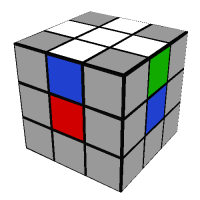
Sometimes, the second layer is sneaky and will throw this sort of situation at you:
Here, none of the second layer pieces are in the right places but you can't get to one of the above 'T' situations. To fix this, just go ahead and do one of the algorithms anyway. In the above picture, using the first algorithm on the yellow-red edge piece will displace the orange-green piece, causing it to move to the top layer like so:
U R U' R' U' F' U FNow that the orange-green piece is in the top layer, you can solve it like normal by rotating the top layer until you find the green upside-down 'T'.
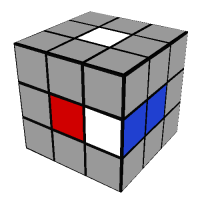
Sometimes, you may meet this situation:
You can solve this in exactly the same way, by using the normal algorithm on a yellow edge piece to displace the red-blue piece which can be solved as normal. Or, if you're feeling particularly clever, you can show it who's boss and see how it likes one of these:
R U' R' U F' U2 F U F' U2 FStep 4 - The Last Layer Cross
As the name suggests, this stage consists of creating a cross on the last layer, like this:
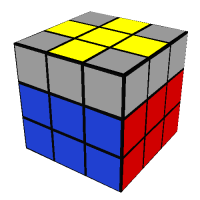
This can't be done in the same way as the first cross (as you'd destroy everything you've worked so hard to do so far), so there are two small algorithms to learn.
Before you apply that algorithm, however, you need to identify which one of the following four situations you now find yourself in:
-
Backwards L, for example:
-
Line, for example:
-
Dot, for example:
-
Cross, for example:


If you have a backwards L shape, then you need to make sure you hold the cube so that it is in the top left corner and apply the following algorithm:
F U R U' R' F'And if you have a line, then you need to hold the cube so it is horizontal and use this algorithm:
F R U R' U' F'If you have a dot, then you need to use both algorithms, in either order. Using the algorithm for the backwards L shape first will produce a line, which you can then solve with the line algorithm. The opposite happens if you use the line algorithm first - it produces the backwards L shape, which you can then solve using that algorithm. Either way, for both algorithms you need to first make sure that you are holding the cube in the right way - the line should always be horizontal and the backwards L should always be in the top left corner. If it isn't in the top left corner, it might be a different kind of L and I would have just typed the word backwards six times for no reason.
If you were lucky, you might have started in situation 4 and already have a cross. This means you can just skip forward to step 5!
If you were very unlucky, however, you might have ended up in secret situation number 5 and are looking at something like one of these:
This means that, regrettably, your cube can not be solved. At all. Really. There is no algorithm that can help you. But all is not lost. Look at this answer on the FAQ page to see what you should do next.
Step 5 - The Last Layer Edges
This step will move the edges of the cross you just created so they line up with the centres, like so:

First, you need to identify which edges need to be moved. Do this by turning the Up face until two of the edge pieces line up with the centre pieces of the same colour. The above picture shows this with the red and blue faces - the blue and red edge pieces in the top layer are next to their respective centre pieces. The remaining two edges that don't line up with their centers are the ones you're interested in, as they need to swap places.
There are three possibilities here:
-
The two edges that need to be swapped are adjacent to each other:
(Cube shown from front and back) -
The two edges that need to be swapped are opposite each other:
-
None of the edges need to be swapped:

In the first situation, where the two incorrect edges are adjacent to each other, the cube first needs to be rotated so that the two edges are in the Front and Right faces. In the example above, this is already the case so no rotation is needed. The algorithm can then be applied thusly:
U R U R' U R U2 R'In the second situation, you simply need to do the algorithm twice. Doing it the first time will make it so that the incorrect edges are now adjacent to each other, which you can solve exactly as the first situation. Remember to rotate the cube so that the incorrect edges are in the Front and Right faces!
As before, if you found yourself in last third situation you can just move straight on to step 6. Some of you might have even been lucky twice and skipped from step 3 all the way to step 6!
Step 6 - The Last Layer Corners 1
This step moves the corner pieces so that they are all in the right place, but not necessarily in the right orientation. So something like this:
First thing to do is to examine your cube and see if any of the corners in the top layer are already in the right place. Even though it isn't facing the right way, you should be able to see that red, blue, and yellow corner in the image above is in the correct place, as it is between the red, blue, and yellow faces. If there are any correct corners, there will either be only one or four. If they are all correct then you can merrily skip to the next step, but if there are only two or three correct, then you can merrily skip to this FAQ answer because, tragically, your cube is unsolvable.
You should be looking at a cube that looks something like this:
The blue-red-yellow corner in this image (the only corner in the correct place) is in a place on the cube imaginatively called the FRU corner. This is because it is the corner formed by the Front, Right, and Up faces. For this step, you need to turn the whole cube so that your correct corner (if you have one) is in the FRU corner before you do the algorithm. If you don't have any correct cubies, then it doesn't matter which cubie is in the FRU corner.
You can then perform this algorithm:
U R U' L' U R' U' LThe other corner cubies (not the one in the FRU corner) will have now changed around. This means that you will now certainly have at least one correctly positioned corner cubie. If you now only have one, do this step again, remembering to hold the correct cubie in the FRU corner. If you did have one correct corner to start with and the other corner cubies are still not all in the right place, you need to perform the algorithm one more time. This should mean that all the corners will now be in their correct places.
Step 7 - The Last Layer Corners 2
This is the last step! It will therefore result in the completed cube, which looks like this:
Unlike the previous step where you needed to find a correct corner, the first thing to do here is find one of the corner cubies that is incorrect. As the goal of this step is to make all of the corners have the yellow side on top, thereby completing the yellow face and whole cube, an incorrect cubie is therefore one that does not have yellow on the top. You need to hold the cube so that one of the incorrect corners is in the FRU corner. I'm sure that you remember that this is the corner formed by the Front, Right, and Up faces. This should look something like this:
Here, you can see that there are three incorrect cubies, as three of them do not have yellow on top, and that one of these incorrect cubies is in the FRU corner. The way the yellow side of this corner is facing is important, as it could be one of two directions:
- Facing to the right, as in the above example:
- Facing forwards, as in this different example:
Of course, it could also be facing up, but then it would not have counted as an incorrect cubie to begin with. The corners in these situations are solved using the following algorithms, but don't do them just quite yet!
- (R' D' R D) (R' D' R D)
- (R' D' R D) (R' D' R D) (R' D' R D) (R' D' R D)
These algorithms require some explaining. Firstly, they have brackets in, which you've never seen before (in an algorithm, I know you've seen brackets before because I've used them a bunch of times. Like now!). They are only there to break the algorithm into chunks and make it easier to follow along, so they don't change the algorithm at all.
Secondly, the first algorithm is just R' D' R D twice and the second algorithm is just the first algorithm twice. This is precisely why the brackets are there, as both algorithms are just R' D' R D multiple times. In the second situation above, where the yellow side of the FRU cubie is facing forwards, the first two sets of R' D' R D in the algorithm brings you to the first situation - the yellow side moves from the front of the FRU corner to the right. You can then do the next two sets of R' D' R D to move it to the top, just like the first situation!
Now that you understand these algorithms, you can go ahead and use them. But be warned! While these algorithms do leave you with the yellow side facing up, they also leave the bottom two layers in a jumbled mess. This is normal, so don't panic!
If your FRU cubie has its yellow side facing to the right, you use this algorithm:
(R' D' R D) (R' D' R D)And if it is facing forward, you use exactly the same algorithm, but twice in a row:
(R' D' R D) (R' D' R D) (R' D' R D) (R' D' R D)The corner cubie should now happily be yellow side up, and the bottom layers should now appear unhappily scrambled. This will happen every time you use these algorithms, but they will sort themselves out very shortly.
Now for the next corner. Use either U or U' to move a new incorrect corner cubie into the FRU corner. The reason that bit is in bold is because it is tempting to move the whole cube instead. Do not do that.
So here is what the process so far has looked like:
-
We started off here, with an incorrect FRU corner:
-
We performed (R' D' R D) (R' D' R D) to make it correct:
-
We then did a U' to move the next incorrect corner cubie into the FRU corner:
You solve this new incorrect cubie in exactly the same way as the previous one. Use the above algorithms again on your new incorrect FRU corner (depending, of course, on if the yellow side of this corner is facing forward or to the right) until the yellow side is facing upwards.
Then simply repeat the process. Use U or U' to move the next incorrect corner cubie into the FRU corner, and then use the algorithms again. Do try to not to worry about the bottom two layers being scrambled. I know it's a bit scary, but they are quite sensible and will resolve themselves when you're done.
Once you have done this on all the incorrect corner cubies, you will be only one turn away from completing the Rubik's Cube!
Congratulations!
Example solve
This step can cause a lot of trouble, especially because it appears to mess the whole cube up and it can be quite difficult to recognise when it's all gone horribly wrong. You can refer to this FAQ answer for some further help, and you can also use this exciting new interactive cube whatsit to see exactly how it's done on a completely different example!
Now what?
Well first, jolly well done on solving the cube. A lot of people don't get this far, so I'm proud of you, really. I hope you enjoyed following this guide as much as I did writing it. If you really enjoyed it, then I recommend to keep doing it! When I first solved the cube unaided, it took about six minutes and now I can do it in under 20 seconds because I didn't stop practising! You can see how you compare using the timer.
Why not try the speedcubing method next? I could do the beginner's method in about 1:30 to 2 minutes before I started learning it, but you don't have to go that far. If you can consistently solve the cube and are looking to go even faster, give it a go!