Speedcubing Guide
So you've gone through the beginner's method a few times, and maybe you can solve the cube unaided every time. Maybe you're even getting pretty good, and can consistently do it in under 2 minutes. But now you're hooked. You aren't satisfied with people standing around for 2 minutes while you solve it because that guy at the office didn't believe you. You want to be one of those people, who can just look at a cube, and ten seconds later boom, it's done. You want a taste of the high-flying, rock and roll lifestyle of the speedcuber. Well here is where your journey begins.
This guide takes you through every step of the CFOP speedcubing method. The name CFOP comes from the steps involved (Cross, F2L, OLL, PLL), and you may also see it referred to as the Fridrich method (after Jessica Fridrich, who helped turn it into the most popular speedcubing technique). Learning and practising this method can take you all the way to the top of the game - it is used by a lot of the top speedcubers to set world records, including the current staggeringly low time of 3.05 seconds.
Full CFOP takes some dedication. If you've just arrived at this website looking to learn how to solve a Rubik's Cube and thought to yourself "Beginner my left foot, I'm starting with the speedcubing guide, that sounds fast", then I warn you now: here be dragons. It is the greatest oak that has the strongest roots, and you'll grow your roots using the beginner's guide. Go on, I'll wait right here.
Are you back? Good. Now that you know the beginner method, you can begin to introduce the concepts in this guide into your solves. You needn't go through the steps in order - you can learn and practise each bit independently, falling back on the beginner method as and when you need it.
Let's jump in!
Step 1 - The Cross
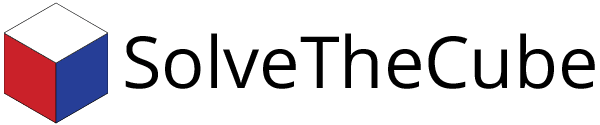
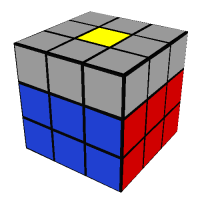
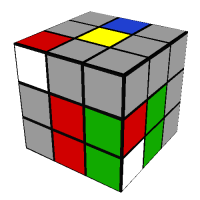
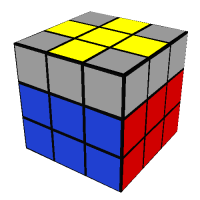
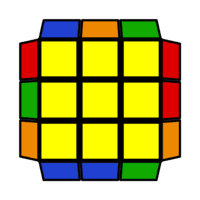
This step is the same as the beginner method - forming a cross on the first layer to get this:
But not exactly the same, as you'll have noticed - the cube is upside down. Indeed, the whole cross is assembled on the bottom layer instead of the top. This will be awkward the first few times you attempt it, but it is certainly worth practising. Not having to turn the cube over after completing the cross on the top layer saves a lot of time, and it also means that you can be looking for the pieces for the next step whilst completing the cross on the bottom.
At this stage, a lot of people still find it quite difficult to intuitively manipulate the cube. This means that doing the cross on the bottom is difficult, as they have come to rely on algorithms for situations that are suddenly upside-down. It is difficult to teach intuition, but through practice it should eventually just 'click' in your head. If doing the cross on the bottom takes much longer than when doing it on the top, don't be disheartened! It does take time to get used to, and it doesn't really matter how long you take when you're practising.
As mentioned above, the sections in this method don't have to be learned sequentially. Move on to the next sections, but keep starting with the cross on the bottom. I have found that the next step (F2L) is a huge help for people to understand how to move cubies to where they want them, a skill that they can later use when returning to the cross.
All of that being said, I can give you some situations to hopefully make the process easier. In this example:
It should be obvious to you that you can simply do F2 to correctly place the white-blue edge piece on the bottom layer. But you could also place the white-red piece by doing this:
F U F R'Something else to bear in mind is that you don't always need to put the edge pieces in the correct place straight away. Consider this situation, and the two approaches to solving it:
 U' B2 F' U' R2F R2 D
The first approach involves taking each edge piece, putting it above where it needs to go, and turning the appropriate face twice to place the piece on the bottom layer. This works, and is an intuitive way to solve the problem, but the second solution is much simpler. It simply solves each piece relative to each other, and then places them in one go. So instead of producing the cross by finding each white edge piece and solving them one by one, what you actually want to be doing is solving each piece at the same time in an efficient way.
You might think that this sounds quite challenging, and you'd be right. But what is life without a bit of a challenge every now and then. If you are thinking "how the dickens is anyone supposed to do this in 3.05 seconds", then the answer is twofold: practice, and inspection time. World Cube Association Regulation A3a1 states that a competitor has up to 15 seconds of inspection time before attempting a solve, and you would want to be spending this time mentally formulating a complete solution to the cross which you could then execute very quickly at the start of your solve. Of course, when you're just sat at home on a lazy Sunday idling the afternoon away with a Rubik's Cube you likely won't be paying much attention to official WCA competition rules, but it does give you something to aim for. Why don't you give it a try - go to the timer page, set inspection time to 15 seconds and see if you can produce a solution to the cross entirely in your head. It can be quite difficult (certainly so if you've only just started doing it upside down) but with practice it will become very easy to isolate only the four edge pieces you need and formulate a basic plan to get them into a cross.
Step 2 - F2L
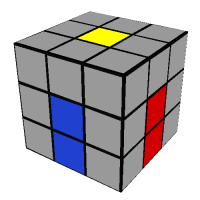
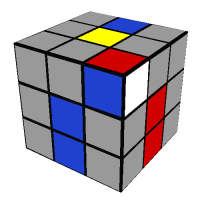
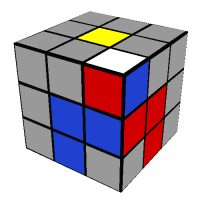
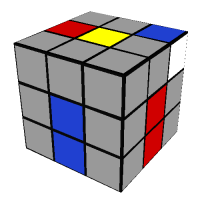
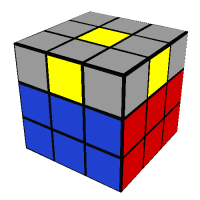
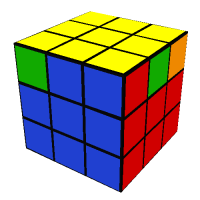
The next step is to solve the rest of the first two layers (which is what F2L stands for) at the same time, to get this:
The idea of F2L is to pair each of the four bottom layer corners with the corresponding edge piece and then insert them into the correct place. Here's a simple example:
 R U R'
The corner piece is paired with the edge piece, and the pair is inserted into the right place. Easy peasy. There are, however, a few situations you might find yourself in where this procedure is not quite so obvious. Here's a similar example:
 (R U2 R') (U R U' R')
This can't be solved as simply, but the idea is exactly the same. The two sections of the algorithm show the two steps in the same procedure as before - the first bracketed section shows the pairing of the two cubies, and the second section shows the pair being inserted correctly. You simply repeat these steps for each of the four corners, and solve each F2L pair in turn.
The important part of F2L is being able to solve each of the pairs without affecting any of the other previously solved pairs. For example, here are two ways of pairing the corner and edge pieces:
 F U2 F'U' R U2 R'
The first algorithm does successfully pair the red-blue corner and edge pieces, but it also lifts out the blue-orange pair from its proper place, thereby undoing any hard work it took to put it there. Instead, a simple U' before the algorithm means that when you then pair the red-blue corner and edge piece, you avoid affecting the blue-orange pair. Instead, the pieces that do get affected are ones you don't care about, as they were occupying the space that you want to put the red-blue pair into.
This idea of finding an empty space on the cube and using it to build a corner-edge pair is crucial to F2L, as of course you want to be able to construct each of the four F2L pairs without disturbing any previously solved ones. But sometimes it can be advantageous to disturb unsolved spaces by choosing a space to build your corner-edge pair that also assists the creation of the next pair. For example:
 U' F U F' UF' U F
In this situation, the first algorithm uses the empty space between the red and blue faces to move the red-blue edge piece so it can be easily paired and inserted. This doesn't disturb any of the other F2L spaces, but you can see that the red-green pieces are looking rather unsolved and unhappy. If you used the second algorithm instead, then the same thing happens to red-blue corner and edge pieces, but now the red-green pieces are much happier and are in a position to be solved much more easily.
You now know the basic ideas of F2L. Have a go on your cube, and see if you can work out how to solve any of the pairs. Rather than relying on a big table of algorithms, F2L is best done intuitively. This is for the same reason as the cross in step 1 - you need to be able to look at the cube and produce an efficient way of solving each F2L pair. Just like with the happy red-green pieces before, sometimes you will come to an F2L situation that you've solved many times, but solve it in a different way because you want to set up the next F2L pair for easy solving.
However, there is such a list on the algorithms page, where you can see each F2L case and how to solve it. They are there so you can see an optimal way to solve each case, but try to not rely on them for every single F2L case you encounter. Instead, really try and solve each case intuitively. Don't worry if you struggle! It takes practise, and the next little section is all about how to be better at F2L.
How to be better at F2L
F2L can be a little difficult to get your head around. Even if you understand the basic ideas above, it isn't always obvious how best to proceed. I shall now try to explain some further concepts that you can use to improve your F2L.
1. Intuition isn't always best
I know, I know, I said that F2L should be solved intuitively, and that you shouldn't rely on a big table of algorithms. If you can intuitively solve every F2L situation you come across then jolly well done, but there are a few cases where there is just a better, faster, much less obvious algorithm to solve it. For example, consider the following two algorithms:
 (R U2 R') (F' U2 F) (U' R U R')(R U R' U') (R U R' U') (R U R')
An intuitive way of thinking about this situation might produce something like the first algorithm, as it follows the usual principles of pairing the edge and corner piece and inserting them together. However, the second algorithm is much faster to perform, as it is essentially the same few moves performed three times. You will also have noticed that the first two brackets are written in red. This is because (R U R' U') is well-known 'trigger' called the Sexy Move. I'm not even kidding. A trigger is simply a sequence of moves that is easy to perform very quickly, and the Sexy Move trigger comes up a lot. Being able to identify it easily will make algorithms that use it easier to learn, so whenever it is used in this guide it will be highlighted in red. This is also why you'll see things like (R U R' U') U', even though you might think it could just be (R U R' U2). It's easier to perform the quick trigger first and then add on the U', as opposed to modifying a well-practised sequence.
There are five such cases that you should learn the algorithmic solution for, and they're all in this nice little table:
That nice little table
(R U R' U') (R U R' U') (R U R') (R U R' U') U' (R U R' U') (R U R')
 y' (R' U' R U) U (R' U' R U) (R' U' R)
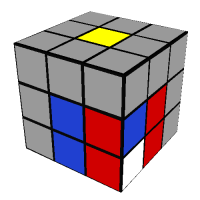 (R U R' U') (R U' R') U d (R' U' R)
 (R U' R') d (R' U' R U') (R' U' R)
2. Cube rotations are bad
Turning the whole cube in your hands is a slow waste of time. Wasting time is bad. Therefore, rotate the cube as little as possible. This might seem like a trivial difference to you, but each little pause adds up, and when you're trying to really push down your solve time every second counts. To this end, the vast majority of the algorithms on this page are comprised of many Rs and Us, as they are easy to perform (sorry lefties). They also tend to use more double layer turns like d as opposed U y'. Both have the same effect, but a double layer turn is quicker. Compare these two algorithms:
 (R U' R') U (F' U' F)(R U' R') d (R' U' R)
Both algorithms solve the F2L pair and use the same number of moves. But the second algorithm is considerably quicker to perform, as you don't have to adjust your hand position at all. The first algorithm either requires you to shift your hand position to twist the F face or start using some peculiar thumb movements.
Try to also remember that you (probably) have two hands. While this is also an excellent life tip, some situations are just better handled on a specific side of the cube. Take this example:
 y' U R U' R' U y' R' U' R(L' U L) U (L' U' L)
Your natural instinct may be to use your right hand, which produces the first algorithm. But just look at it. It's an abomination. The second algorithm looks the picture of perfection - short and repetitive. It's beautiful, and no horrid cube rotations.
3. Slow and steady wins the race
It's all very well and good being able to perform algorithms quickly, but perhaps the most important thing with F2L is to perform the algorithms continuously. If you perform each algorithm as quickly as humanly possible, you don't leave yourself much time to analyse the cube and isolate the next corner-edge pair you want to solve. This leaves you with a very start-stop, stuttery solve as you rapidly perform an algorithm and then stop to find the next one.
Instead, it is much better to perform the algorithms slightly more slowly in one continuous stream. This practise is called lookahead, and is vital if you want to achieve solve times under 20 seconds. Although the idea of slowing down in order to speed up may be counter-intuitive, a useful exercise is to practise F2L at an exaggeratedly slow speed. Very slow indeed, about 1-2 seconds per quarter turn of a face. At this pace, you remove the temptation to focus only on the pieces that you are currently applying an algorithm to, and you can easily be looking at the rest of the cube to find the next F2L pair.
This idea does not mean that the previous advice of how to perform the algorithms is redundant. Remember when I said 'wasting time is bad'? That's still true. You want to eliminate wasted time searching for pieces. Going slowly isn't better - going faster is better, but you'll get faster by going slower. Through practice, your lookahead will improve to a point where you can perform every algorithm very quickly, but without losing the ability to know what you're doing next. This advice applies to all of steps in this guide, but it is most important during F2L and step 1, the cross. Try practising going from a scrambled cube to completed F2L very slowly, and making sure you have a continuous steady flow.
Step 3 - OLL Edges
Now, when you're solving the cube using the full CFOP method, the whole last layer is supposed to be solved in two steps:
- OLL, or Orientation of the Last Layer
- PLL, or Permutation of the Last Layer
These steps are solved using only one algorithm each. So the first algorithm orients all the last layer pieces (makes them all face the right way, i.e. with yellow on top) and the second permutes them (puts them all in the right places). 'Orientation' always refers to the way a cubie is rotated, and 'permutation' always refers to where it is on the cube. As you might well imagine, this means that full CFOP has a lot of algorithms in it - one for every situation you might encounter. If you clicked the link to the algorithm page before, you'll have seen that the list is indeed quite long. I assure you that the rabbit hole goes even deeper than that, and every situation actually has multiple algorithms for your learning pleasure.
So instead, what we're going to do, you and I, is cheat a little. It's ok, no one has to know. I'm going to show you a slightly different way of approaching the last layer, so that you only need to know a few algorithms instead. Then, once you know those few algorithms, you can begin to learn the rest of the last layer algorithms while always being able to fall back on the ones you know. What's even better is that these few algorithms are used in the full CFOP method anyway, so we're not wasting any time!
The way it works is to split up the steps into two smaller steps each. So for OLL, instead of orienting every piece in the last layer at once, we'll do the edges first and then the corners. This is called 2-look OLL, as it's OLL but done in two steps. Makes sense. PLL gets the same treatment, as we'll be permuting the corners first and then the edges. That's called 2-look PLL.
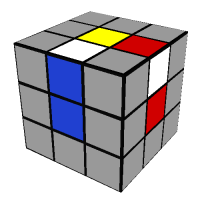
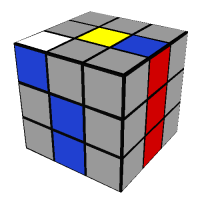
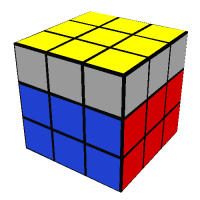
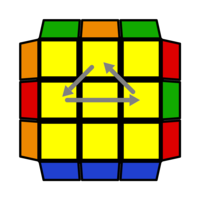
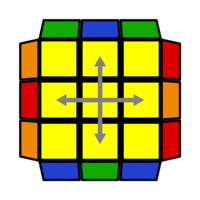
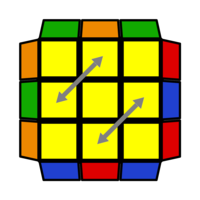
So the first step of 2-look OLL is to orient the edge pieces, like this:
This is also called EOLL, or Edge Orientation of the Last Layer. It's quite an easy step, as it is essentially the same as step 4 from the beginner guide, which is to get a cross on the top face. But because you're not a beginner any more, you can be a little clever if you find yourself presented with this:
 R U2 (R2' F R F') U2 (R' F R F')
If you remember, the beginner method solves a dot situation by using both F U R U' R' F' and F R U R' U' F' and also having to spin the cube about in the middle. Using this algorithm is much faster, as it makes a cross in one go. There are lots of algorithms for doing this, but I like this one the best. Even though you can already solve this case using the beginner way, I would take the time to practise and learn this algorithm now. Not only will it help you speed up whenever you find yourself with a dot on the last layer, but when you see this algorithm again during proper 1-look OLL, you'll feel all smug because you already know it.
Much like the Sexy Move highlighted in red before, the sequence (R' F R F') is a trigger called the Sledgehammer, and you'll spot it lurking about in other places and algorithms. Being able to recognise it and perform it without thinking will make the task of learning lots of algorithms much, much easier.
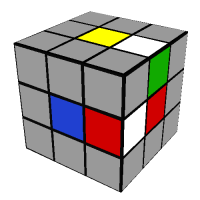
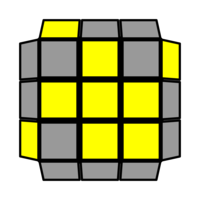
Step 4 - OLL Corners
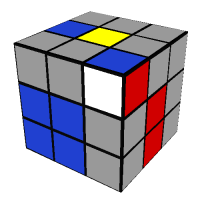
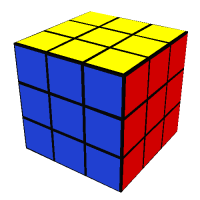
The next step is to correctly orient the corner cubies:
This is called OCLL, or Orient Corners of the Last Layer. "Why isn't it called COLL?" I hear you ask. Because it was taken already, that's why. COLL and CLL both mean different things to other cubers, and sticking to convention makes things a lot easier for everyone involved. "I'm going to call it COLL anyway" I hear you petulantly respond. Well go ahead, but don't blame me when you're trying to make friends with other speedcubers and you have to listen to "Wait, do you mean COLL as in orienting and permuting last layer corners while preserving edge orientation, or just orienting the corners and preserving edge orientation but ignoring all last layer permutation?" every 30 seconds, and you have to say "I don't know, I chose arbitrary visual consistency on some website over internal clarity of naming structure and now I feel nervous and stressed".
Just like the beginner guide, the rest of the last layer isn't an intuitive thing you can just work out (if you can, you and your mega-brain should probably be working for NASA or something). That's why there's a big scary table of algorithms lurking on the algorithms page, but because we're using our clever 2-look shortcut, you only need to know the following seven. They don't look scary at all, and there's even some triggers in there that you've already seen!
OCLL algorithms
 (R' U2 R) U (R' U R)
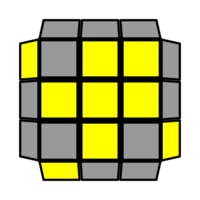 (R U2 R') U' (R U' R')
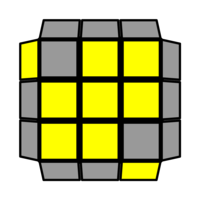 F' (r U R' U') (r' F R)
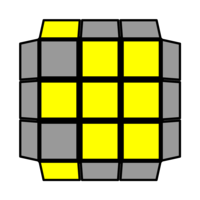 (r U R' U') (r' F R F')
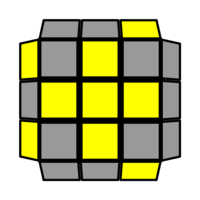 R U2 (R2' U' R2 U') (R2' U2 R)
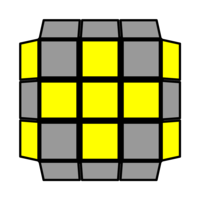 (R U R') U (R U' R') U (R U2 R')
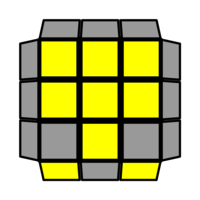 R2 D (R' U2 R) D' (R' U2 R')
Step 5 - PLL Corners
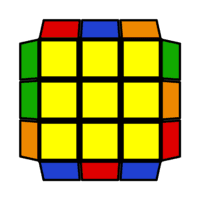
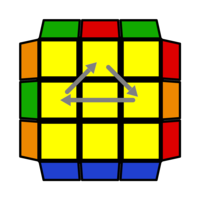
Now that the OLL is done, you can start PLL. This step is called CPLL, as it aims to permute the corners - that is, move them to their correct positions like this:

To do this, you need to look for 'headlights' - a face where both top layer corners are the same colour (presumably named due to their resemblance to the headlights of a car). In the following example, you can see that the 'headlights' are on the Front face, as the top layer corners are both blue.
You then hold the headlights so they are facing to the right, and perform this algorithm:
 x (R2 D2) (R U R') D2 (R U' R)
The corner pieces should then be permuted correctly in relation to each other - but you might need to turn the top layer so that they are back in the right places.
Sometimes there are no headlights to be found, like this:
You have two options here. First, you can just use the above algorithm anyway, which will make some headlights for you to solve as above. The second option is this algorithm:
 F R U' R' U' R U R' F' (R U R' U') (R' F R F')
As above, you might now need to turn the top layer to realign the corner pieces. Using this algorithm is preferable than using the first algorithm twice, as it will be much faster to perform. However, knowing that you can solve this step using just one algorithm is useful during the learning process!
Step 6 - PLL Edges
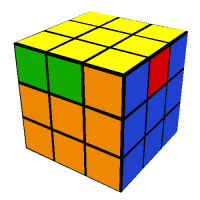
This step aims to permute the edge pieces, which by now you have probably worked out is also called EPLL. This completes the cube, which you probably know looks like this:
To start with, you will either have only one correct edge or none at all. If you only have one, then which algorithm you use depends on the direction that the other edges need to be cycled. If they need to move clockwise, then use this algorithm:
 (R' U R' U') R' U' (R' U R) U R2
And if they need to move anticlockwise, use this algorithm:
 R2 U' (R' U' R) U R U (R U' R)
If you had no correct edges in your last layer, you can just use one of the above algorithms anyway, like with the corners in the previous step. This will correctly permute one of the edges, allowing you to solve the rest with one more use of the above algorithms.
There are, however, some more optimal algorithms. If you need to swap opposite edges, you can use this algorithm:
 (M2 U M2) U2 (M2 U M2)
And if you need to swap adjacent edges, use this algorithm:
 R' U' R2 U (R U R' U') R U R U' R U' R' U2
And that's it! You solved a Rubik's Cube using the CFOP method!
Congratulations!
Transitioning to full CFOP
I would recommend that you keep using the 2-look algorithms until you feel confident with most of this speedcubing guide. You will have to rely on them in practically every solve until you learn every other OLL and PLL algorithm, which will take you some time and effort. As you practise incorporating the techniques on this page into your solves, you will learn to recognise the various other OLL and PLL situations, which will help immensely in their memorisation.
Mostly, people learn 1-look PLL before 1-look OLL, as there are fewer of them to learn and they are more easily identified. Start using the algorithms page to learn each of the PLL algorithms. You can do this in whatever order you choose but I have arranged them in what I think is a sensible order to learn them - I have grouped similar algorithms, and put what I think are the easier ones first.
Once you have learned a few more PLL algorithms, you can start learning OLL. The algorithm page has each OLL algorithm ordered by the shape they resemble, so you can find which situation you need easily. You can also order the table by trigger, which I think is much more conducive to memorisation. Once you know the first trigger, you almost know 22 OLL algorithms straight away - that's about 40% already! Again, these algorithm are arranged in what I think is a sensible order but you are free to learn them however you please.
It is worth knowing that each and every F2L, OLL, and PLL situation have many, many different algorithms that can solve them. I have gone through each of these situations and chosen algorithms that I think are easy to both perform and learn, but you may feel differently. Fortunately, there is a huge algorithm database for your perusal, where you can find the perfect algorithms for you. This database is part of the speedsolving.com wiki, which has a wealth of information about everything speedcubing related.
I sincerely hope that you have enjoyed this introduction to speedcubing, a hobby that I and many others enjoy very much. Why not see how well you can do with the timer, and please do get in touch if you have anything you'd like to say, or leave a comment below!